Home / All Posts / Fixing Broken Chairs – With Upholstery Webbing

How I Fixed a Broken Chair by Replacing the Springs with Chair Webbing

This chair had been getting worse for a while. A bent spring, lopsided seat, unstable, and honestly annoying to sit in. I knew I didn’t want to mess with rebuilding the springs. I’ve tried that before, and between the tension and the sharp metal, it’s way too easy to hurt yourself. After a little bit of research, I found out that you can swap out the springs for chair webbing. Upholstery webbing is the strong woven material that stretches across the frame of a chair or sofa to support the seat. Replacing the springs for chair webbing turned out to be a surprisingly quick and simple way to fix a broken chair.
What Was Actually Broken

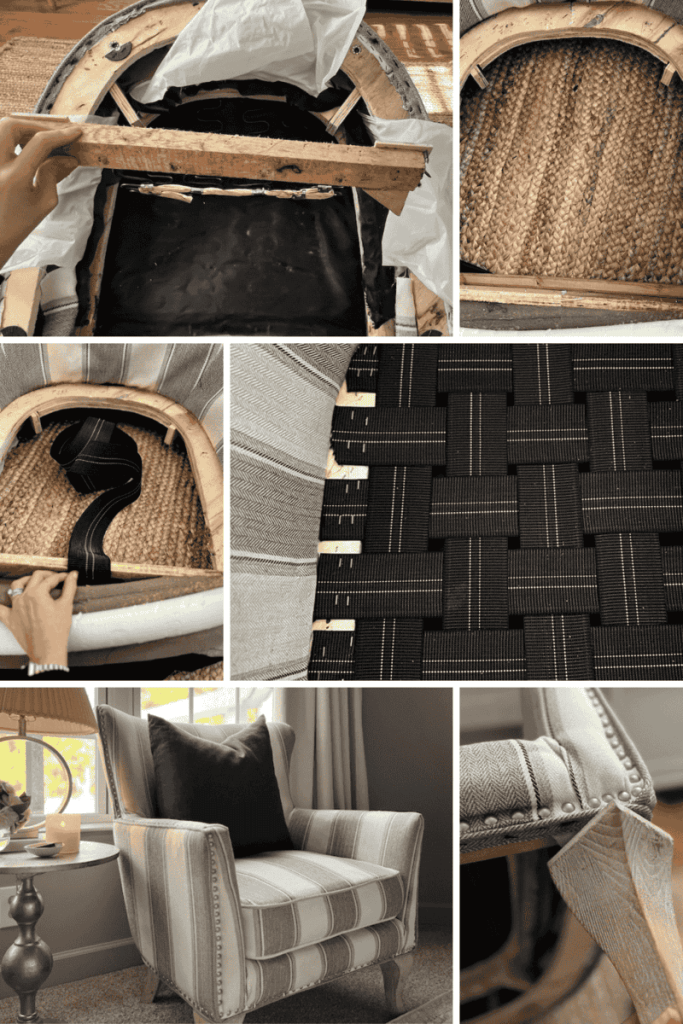
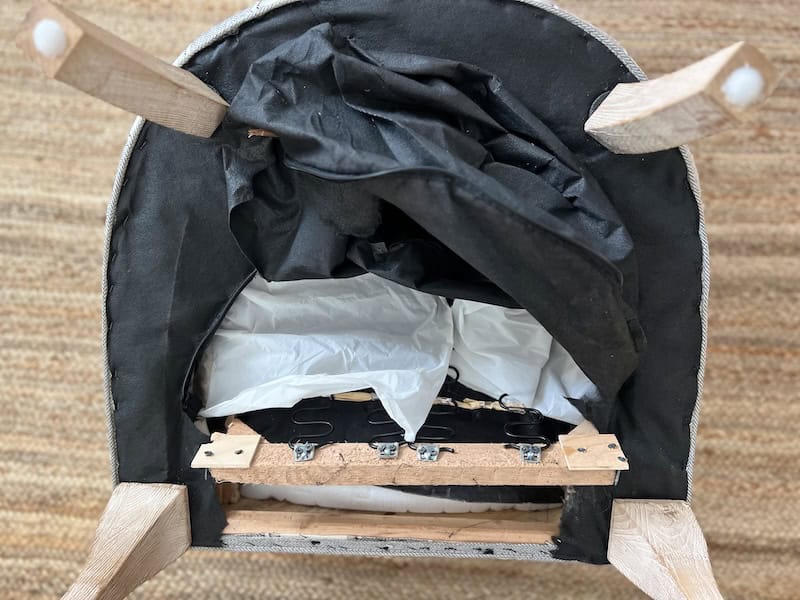
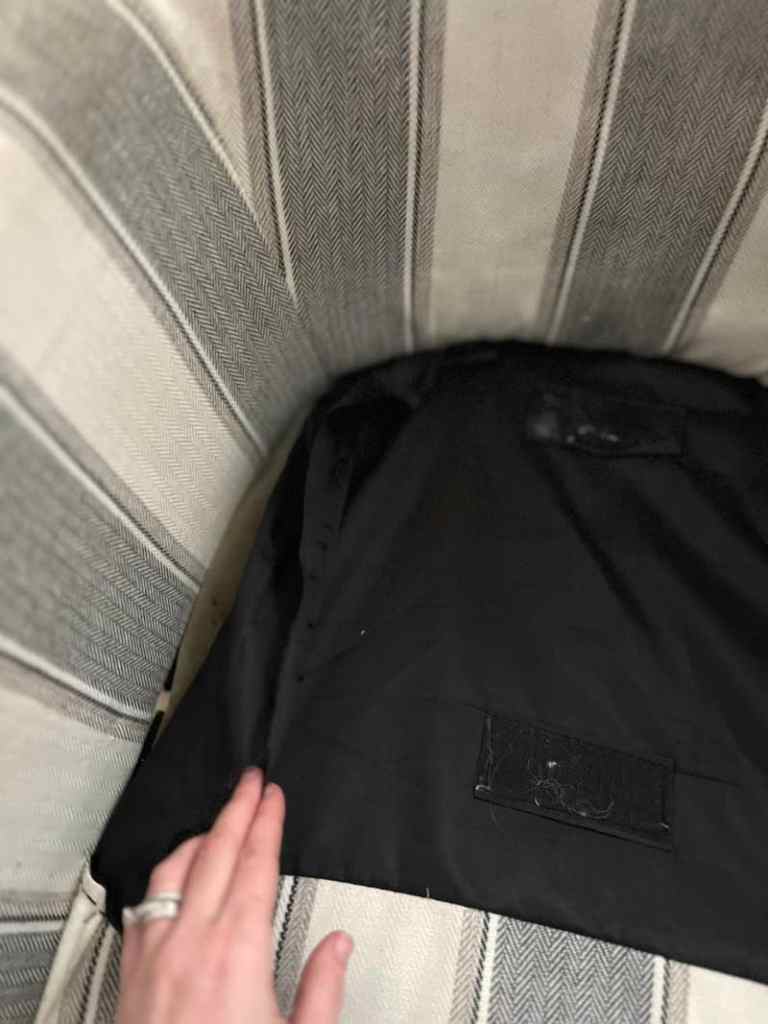
Once I removed the fabric on the bottom, I found a snapped support board. The springs were still there, but one end had been tacked to the seat with a flimsy piece of plywood. So not very sturdy in the first place. 

The padding and top fabric were still in good shape, which meant I didn’t need to reupholster the whole chair—just fix what was underneath.
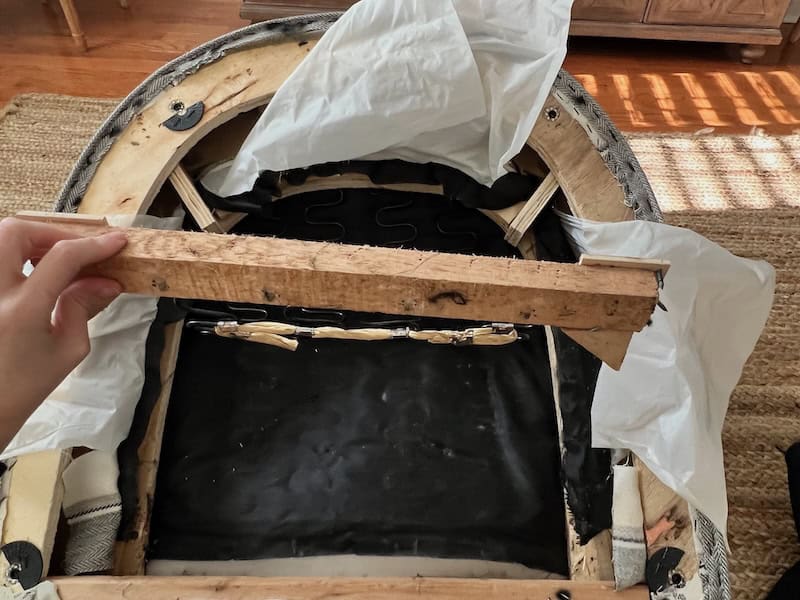
A close-up image showing a person's hand holding a wooden piece while examining the inside of a chair, which is partially disassembled. The chair's frame is visible with black material and some white fabric covering it.
The support bar had broken on this chair

Disclaimer: This page may contain affiliate links. If you click on one of these links and make a purchase, I may receive a small commission at no extra cost to you. I only recommend products and services that I believe will add value to my readers. See our full Affiliate Disclosure at this link.


If you’re already fixing one chair, you’ll probably end up with more ideas of things to fix—this is the same process I’ve used in other furniture projects too
What You Actually Need (and What Matters Most)

I’ve tried a few different ways to fix chairs, and this is what actually worked long term:

If you’re only buying one thing for this project, make it the staple gun—it makes everything else easier. Check out my tool buying guides here.
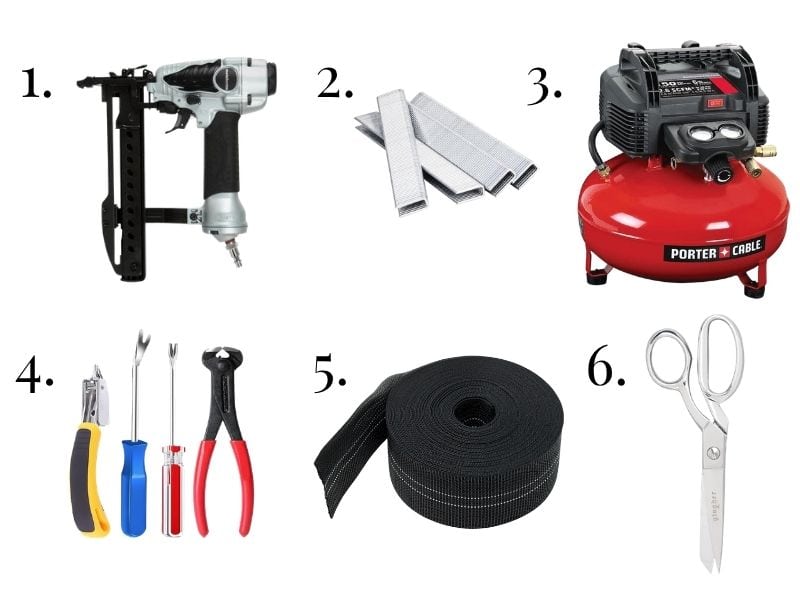
Image of a nail gun used for upholstery, upholstery staples, an air compressor, upholstery tools to remove staples and a roll of chair webbing and a fabric scissor

Staple Gun (don’t skip this)

What I used
1. Heavy-duty staple gun (& 3. compressor)
This is the one tool that makes or breaks the project. A weak staple gun won’t drive staples deep enough into hardwood, and you’ll end up fighting it the whole time.

Staples (½” worked best for me)

What I used:
2. Meite 18 Gauge for 1/4-Inch Crown 1/2-Inch Length Staples
Long enough to hold, but not so long that they come through the frame. These penetrate the fabric cleanly without tearing (less jamming). And the 1/4 crown makes a minimal hole.

Pliers & screwdriver

What I used:
4. Upholstery Staple and Nail Remover Set
This made a huge difference. Pulling out old staples without it is slow and honestly pretty rough on your fingers. This tool gets under them quickly and saves you a lot of frustration. It also works for removing carpets. (see how we replaced the carpet on on our stairs with wood)

Upholstery Webbing

What I used:
5. Elastic upholstery webbing
The 10% stretch provides just the right tension, and those staples hold it securely . One roll of webbing was more than enough. I fixed two chairs and still had some left over. It’s also weather-resistant so it can be on outdoor furniture.

Scissors or a utility knife

What I used:
6. Gingher Scissors Knife-Edge Dressmaker Shears 7″This is one of those tools that actually lasts—people keep these for decades—so if you’re going to invest in anything beyond the basics, this is worth it. They cut through fabric so cleanly, they have nice weight and the bent handle makes it easier to keep your cuts straight, especially when you’re working on something larger like a seat.


Webbing vs Springs (What’s Actually Better?)

  • Springs = more bounce, harder to fix
  • Webbing = easier, quieter, cheaper

How to Fix Broken Chair Springs

Step 1: Remove the Springs

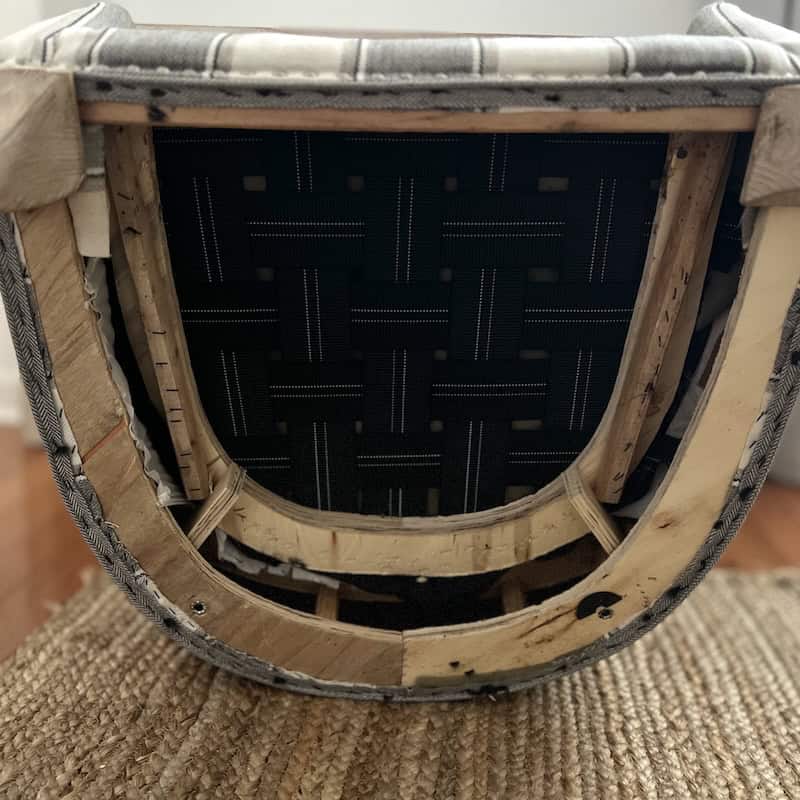
I flipped the chair over and removed all the staples holding the seat fabric in place. Using a hammer, screwdriver, and pliers, I pulled out the metal clips and springs.

Once the springs were out, I had a clean wood frame to work with—and honestly, it was way easier than trying to wrestle broken coils back into place.
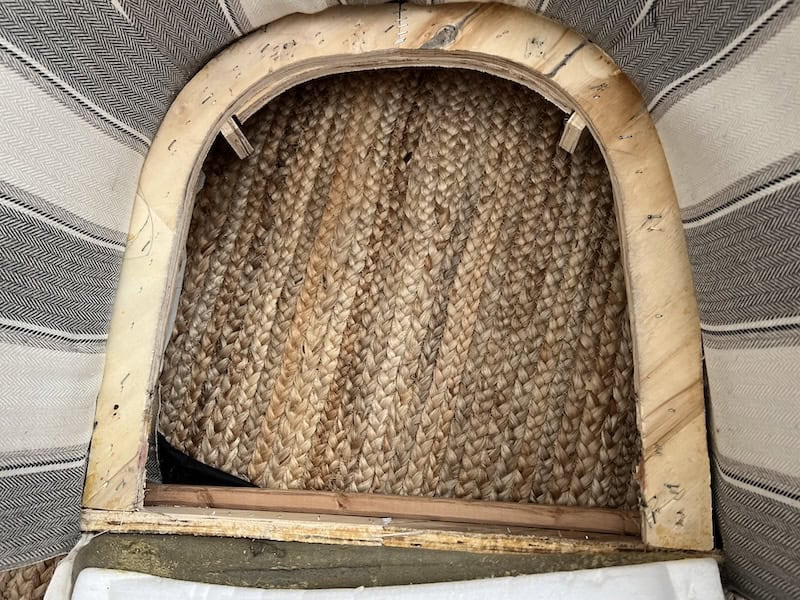
Close-up view of a wooden chair's underside, showing woven rush seating and the frame structure.
After springs were removed

Step 2: Clean Up the Frame

I pulled out any loose staples and checked that the wood frame was still solid. If anything had been loose, I would’ve glued or screwed it first—but mine was still sturdy.
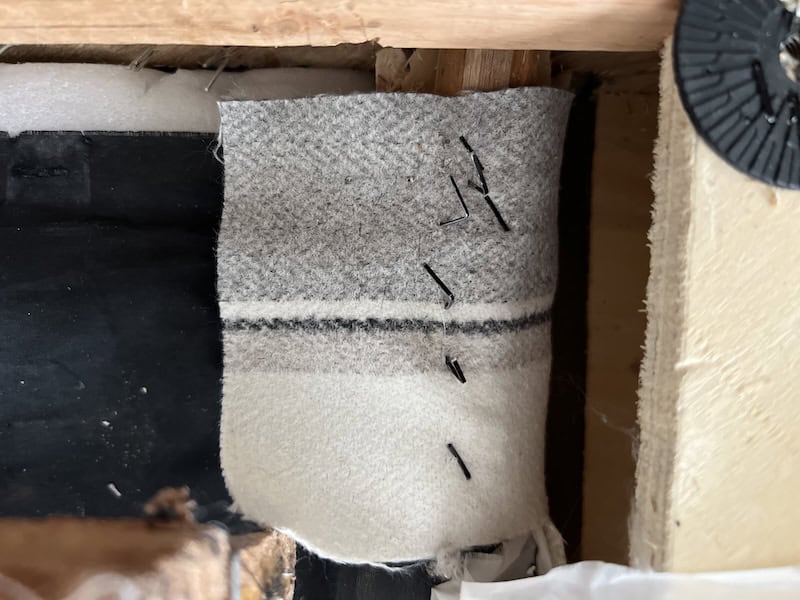
A close-up view of a piece of gray and white fabric being sewn, with visible black stitches and pins securing it to a wooden structure.
I had to remove all the staples holding the upholstery to the seat

Step 3: Replace Chair Springs With Webbing

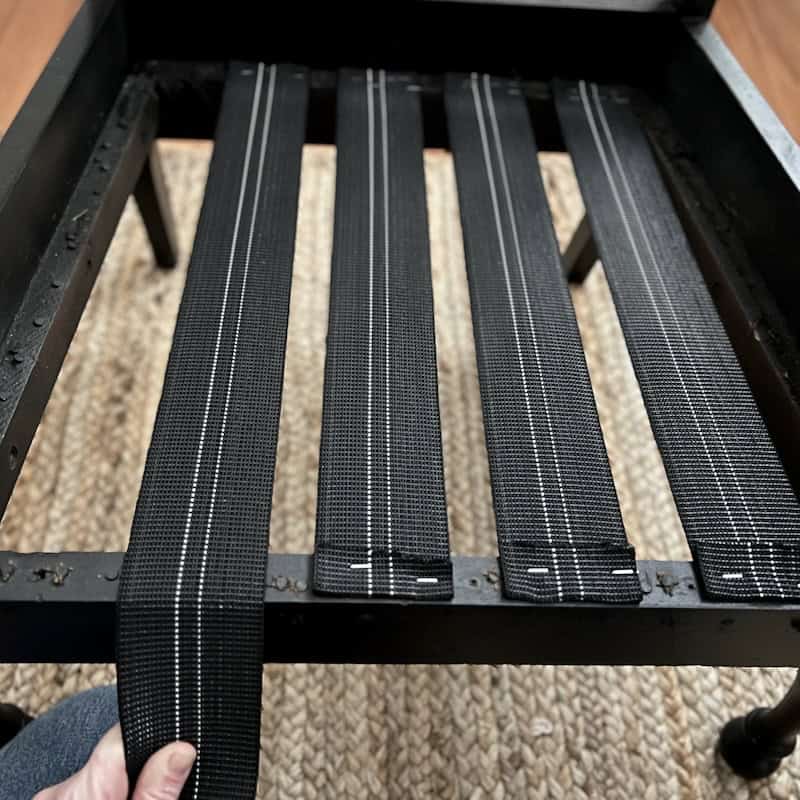
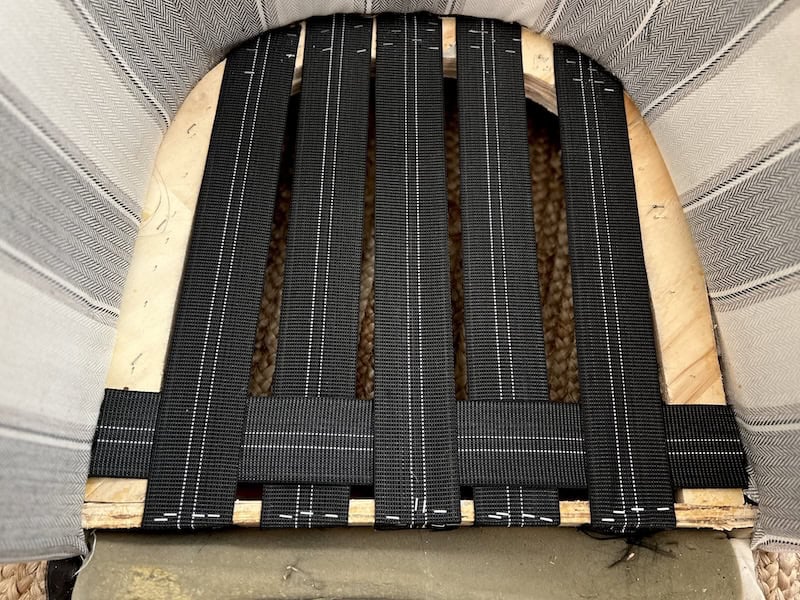
I started by running webbing strips from the front of the seat to the back. Think of it like creating a grid, tight enough to support weight, but not overlapping at first. You will weave the strips side-t0-side after you staple to the front-to-back strips.

  • First, I stapled the end closest to the seat back (about 4–5 staples).
  • Then I pulled the strip tight—firm, not stretched like a trampoline—and stapled it in place.
  • I wrapped the loose end around the front of the chair and stapled again.
  • I used 5 strips, spaced about ½” apart.

The goal is a strong base with no big gaps that could sag later.
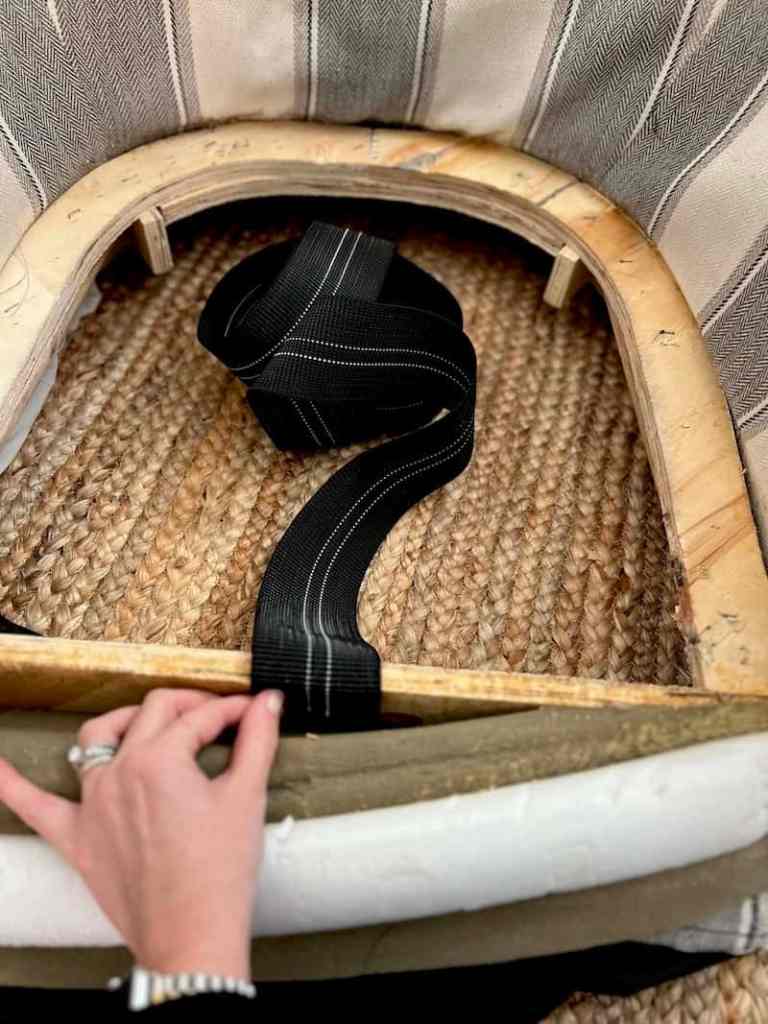
A hand holding a black strap inside a furniture frame made of wood, with woven material below and a striped fabric visible in the background.
I stapled webbing strips from front to back.

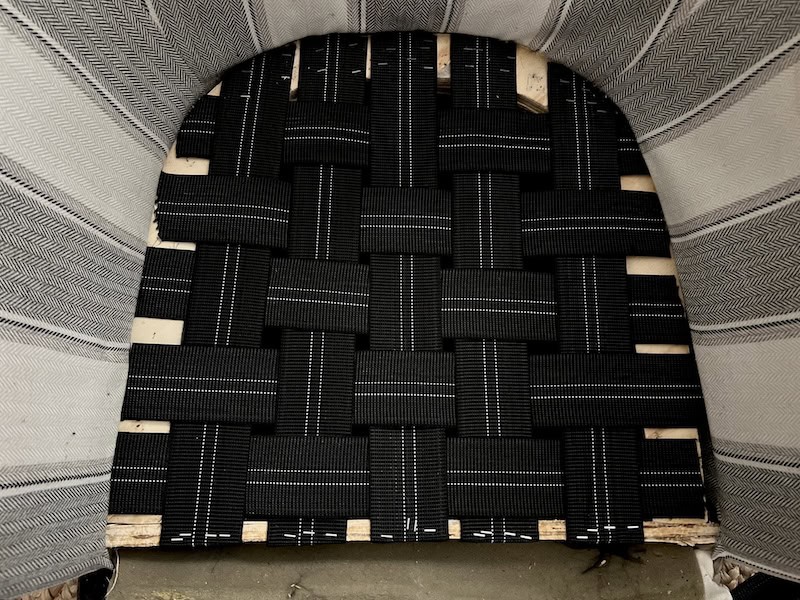
Step 4: Add the Second Layer (Side to Side)

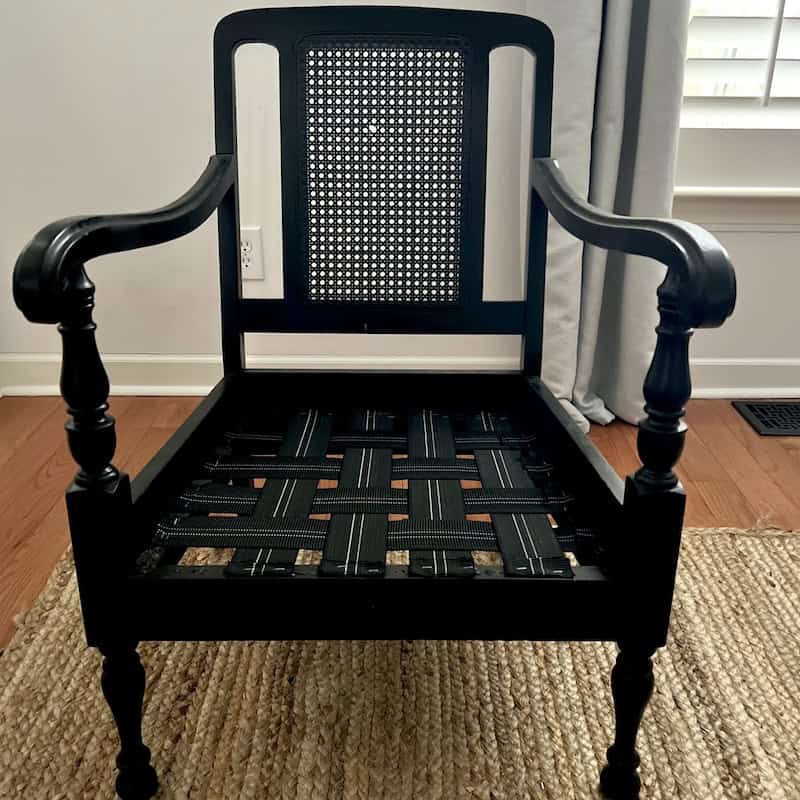
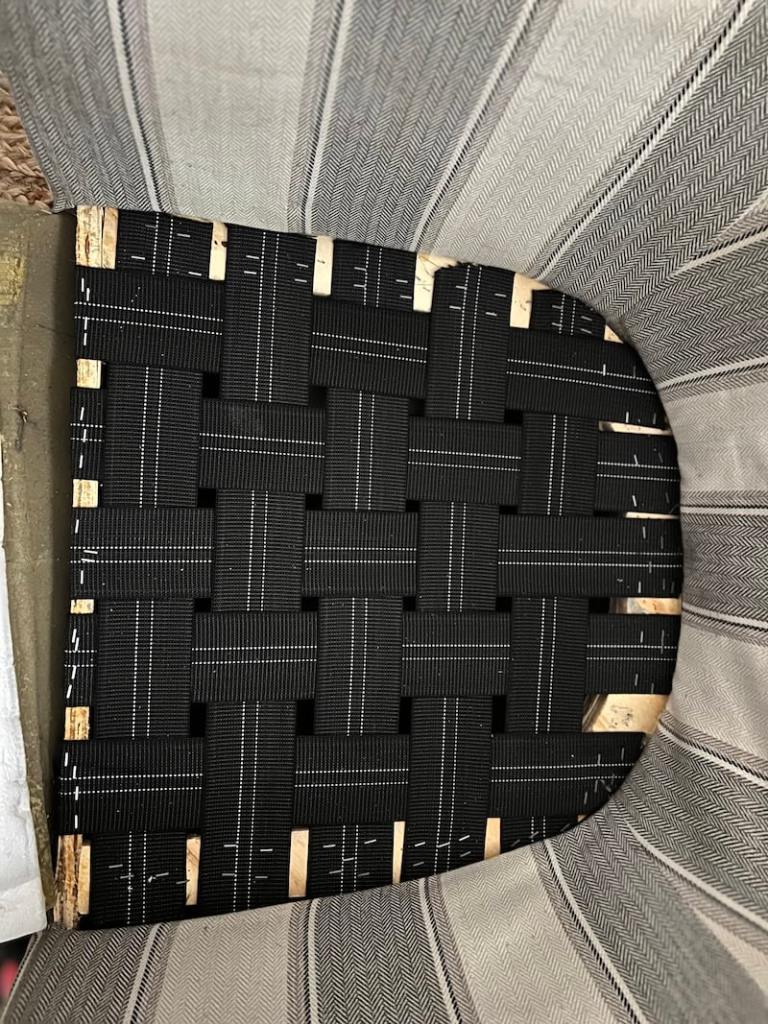
Next, I ran webbing side to side over the first layer to create a grid.

  • Stapled one end, then pulled it tight from underneath
  • Same tension: tight, not overstretched
  • Again, 5 strips across

This grid replaces what the springs used to do.

Step 5: Test It Before Closing

Close-up view of a woven chair seat made of black fabric straps and wooden supports.

Before stapling everything back:

  • I tucked the fabric back into place
  • Put the legs back on
  • Replaced the cushion
  • Sat on it
  • Checked it against the matching chair

If it dips more than about an inch in the center, it needs more webbing. Mine felt firm and even, so I left it.

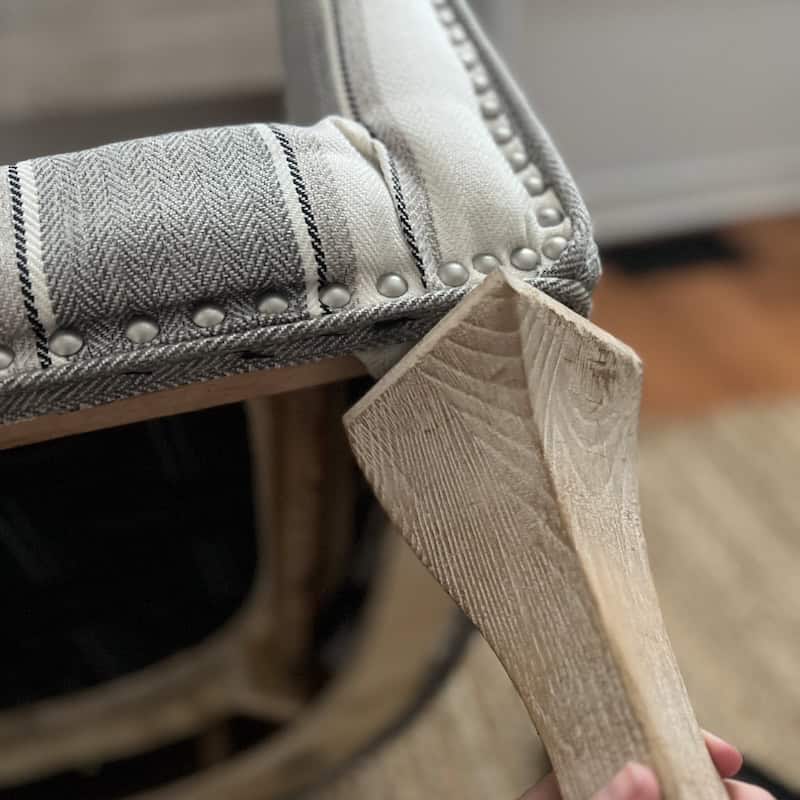
Close-up of a wooden tool being used to adjust or repair the fabric on a chair with decorative nailhead trim.
After with all strips staples, putting legs back on

Step 6: Close It Up

Once I was happy with the support, I stapled the dust cover back on and trimmed any loose fabric.

That was it.


What It Feels Like Now

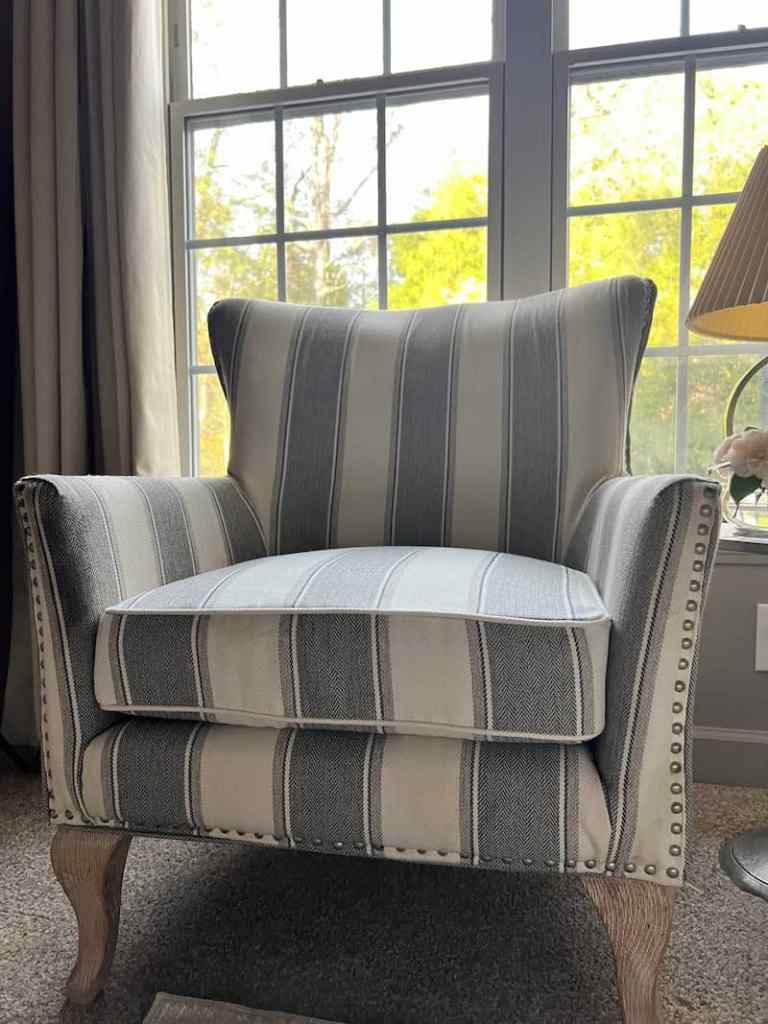
It’s more comfortable than it was with springs. There’s no bounce—but it’s solid, supportive, and doesn’t sag.

It feels almost exactly the same height as the other chair, which is exactly what I wanted for this space.

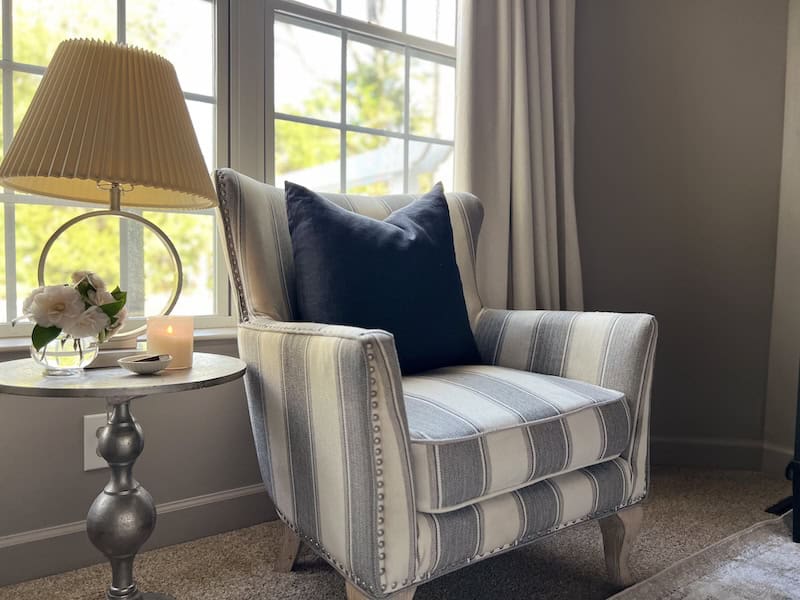
A cozy armchair with a striped fabric design, featuring a high back and cushioned seat, positioned near large windows with natural light.
Two stylish striped armchairs with dark blue cushions sit next to a large window, featuring yellow blinds and a lamp in between them, with greenery visible outside.

Would I Do It This Way Again?

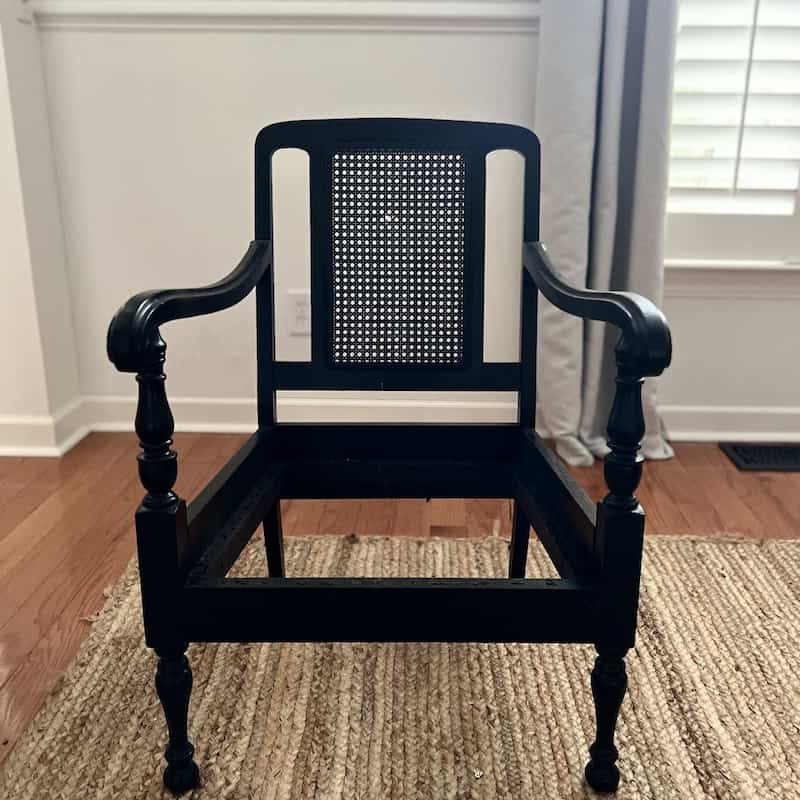
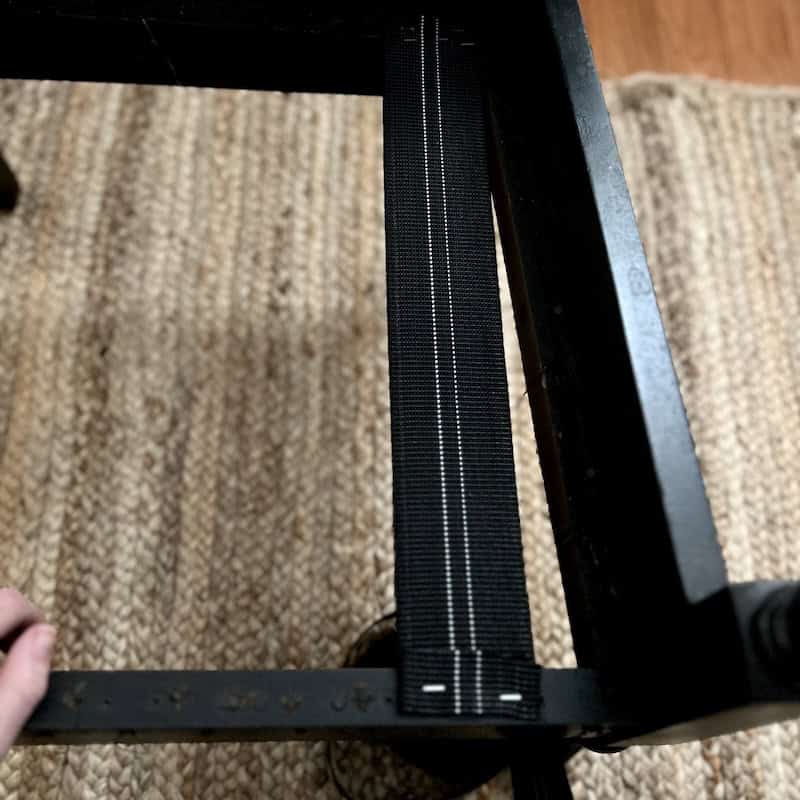
Absolutely—and I already did. Right after this chair, I fixed an antique cane-back chair on my front porch using the same method. I just had to fold the front ends of the webbing neatly since they were visible.

Pros:

  • Cheap and simple
  • Quick
  • No metal to fail later
  • Quiet—no squeaks
  • Strong and supportive

Cons:

  • None so far

Final Take

If you have a chair sitting in your house that no one wants to sit in—this is the easiest fix I’ve found.
And once you do one, you’ll start looking for more to fix. Removing the springs and replacing them with upholstery webbing is a simple way to make it solid again.


It’s not traditional upholstery. 

But it works—and sometimes that’s the only goal that matters.


FAQ: Reupholstering Chairs | Replacing Springs with Webbing

Can you fix springs in a chair

You can—but it’s way harder than it looks. Between special clips, tensioning tools, and wrestling heavy springs, it’s easy to make it worse or unsafe. After trying it myself, I’d say spring repair is better left to professionals unless you’re fully set up for upholstery work.

Upholstery Webbing vs Springs: Which is Better?

Upholstery webbing is easier to install, quieter, and more budget-friendly than springs, which makes it a great option for most DIY repairs. Springs have more bounce, but they’re harder to replace and usually require more tools and experience.u003cbru003eIf your goal is to fix a sagging chair quickly and actually use it every day, webbing is the simpler and more practical option.

Can you replace chair springs with webbing?

Yes. Upholstery webbing can fully replace springs and create a firm, supportive seat without metal components.

How do I choose the right webbing?

Natural fibers like jute or cotton give a firmer feel. Nylon and polyester are stronger and will last longer, especially outdoors. Elastic webbing is more flexible and comfortable, which is why I used it. The right choice really comes down to the style of the chair, how much support you want, and whether it’s for indoor or outdoor use.

Do I need a webbing stretcher?

No. It helps, but I just pulled the webbing tight by hand and stapled it in place. For elastic webbing you would use a stretcher with clamps, for traditional jute webbing you would use one with teeth. 

How do you tighten webbing on chairs?

Staple one end first, then pull the webbing tight and staple the other end. If it feels too soft after testing, add another strip or replace the loose one.


Leave a Reply

Your email address will not be published. Required fields are marked *

I’m Bailey

On Maple Lane logo – black outline graphic of a traditional Southern home with a transparent background

I share renovation projects and smaller DIY’s for real homes. Practical, budget-friendly upgrades and step-by-step projects you can actually do yourself.

I hope you find ideas you love, projects you can actually use, and a little inspiration along the way—no matter your style or budget.

recent popular posts

new finds

Project Sources

tiktok https://www.tiktok.com/@onmaplelane

Shop the exact products used in my home and DIY projects.

Let’s connect

Special Offers From Our Affiliate Partners


two pages logo coupon code ONMAPLELANE
exclusive coupon code
ONMAPLELANE
for 22% off
design shop coupon code
DesignShop
Get 2 FREE samples when you sign up here.
vevor coupon code
VEVOR.com
Exclusive Extra 15% Discount for VEVOR US Top Picks
coupon code: VVUSTO
hychika coupon code
hychika coupon code
serwall coupon code
serwall outdoor coupon offers
Serwall Outdoor
coupon code
GOSUMMER
for $50 + 6% off
OUTLET15
Extra 15% Off Selected Clearance Products
ruggable coupon code
Labor Day Sale! Save up to 30% Off
Morris & Co. Sanderson, Mrs. Alice, Scalamandré 
samplize coupon code
Samplize Peel and Stick Paint Samples
20% off orders $45+
Code LDW20
Home / All Posts / Fixing Broken Chairs – With Upholstery Webbing

How I Fixed a Broken Chair by Replacing the Springs with Chair Webbing

This chair had been getting worse for a while. A bent spring, lopsided seat, unstable, and honestly annoying to sit in. I knew I didn’t want to mess with rebuilding the springs. I’ve tried that before, and between the tension and the sharp metal, it’s way too easy to hurt yourself. After a little bit of research, I found out that you can swap out the springs for chair webbing. Upholstery webbing is the strong woven material that stretches across the frame of a chair or sofa to support the seat. Replacing the springs for chair webbing turned out to be a surprisingly quick and simple way to fix a broken chair.


What Was Actually Broken

Once I removed the fabric on the bottom, I found a snapped support board. The springs were still there, but one end had been tacked to the seat with a flimsy piece of plywood. So not very sturdy in the first place. 

The padding and top fabric were still in good shape, which meant I didn’t need to reupholster the whole chair—just fix what was underneath.

A close-up image showing a person's hand holding a wooden piece while examining the inside of a chair, which is partially disassembled. The chair's frame is visible with black material and some white fabric covering it.
The support bar had broken on this chair

Disclaimer: This page may contain affiliate links. If you click on one of these links and make a purchase, I may receive a small commission at no extra cost to you. I only recommend products and services that I believe will add value to my readers. See our full Affiliate Disclosure at this link.


If you’re already fixing one chair, you’ll probably end up with more ideas of things to fix—this is the same process I’ve used in other furniture projects too


What You Actually Need (and What Matters Most)

I’ve tried a few different ways to fix chairs, and this is what actually worked long term:

If you’re only buying one thing for this project, make it the staple gun—it makes everything else easier. Check out my tool buying guides here.

Image of a nail gun used for upholstery, upholstery staples, an air compressor, upholstery tools to remove staples and a roll of chair webbing and a fabric scissor

Staple Gun (don’t skip this)

What I used
1. Heavy-duty staple gun (& 3. compressor)
This is the one tool that makes or breaks the project. A weak staple gun won’t drive staples deep enough into hardwood, and you’ll end up fighting it the whole time.

Staples (½” worked best for me)

What I used:
2. Meite 18 Gauge for 1/4-Inch Crown 1/2-Inch Length Staples
Long enough to hold, but not so long that they come through the frame. These penetrate the fabric cleanly without tearing (less jamming). And the 1/4 crown makes a minimal hole.

Pliers & screwdriver

What I used:
4. Upholstery Staple and Nail Remover Set
This made a huge difference. Pulling out old staples without it is slow and honestly pretty rough on your fingers. This tool gets under them quickly and saves you a lot of frustration. It also works for removing carpets. (see how we replaced the carpet on on our stairs with wood)

Upholstery Webbing

What I used:
5. Elastic upholstery webbing
The 10% stretch provides just the right tension, and those staples hold it securely . One roll of webbing was more than enough. I fixed two chairs and still had some left over. It’s also weather-resistant so it can be on outdoor furniture.

Scissors or a utility knife

What I used:
6. Gingher Scissors Knife-Edge Dressmaker Shears 7″This is one of those tools that actually lasts—people keep these for decades—so if you’re going to invest in anything beyond the basics, this is worth it. They cut through fabric so cleanly, they have nice weight and the bent handle makes it easier to keep your cuts straight, especially when you’re working on something larger like a seat.


Webbing vs Springs (What’s Actually Better?)

  • Springs = more bounce, harder to fix
  • Webbing = easier, quieter, cheaper

How to Fix Broken Chair Springs

Step 1: Remove the Springs

I flipped the chair over and removed all the staples holding the seat fabric in place. Using a hammer, screwdriver, and pliers, I pulled out the metal clips and springs.

Once the springs were out, I had a clean wood frame to work with—and honestly, it was way easier than trying to wrestle broken coils back into place.

Close-up view of a wooden chair's underside, showing woven rush seating and the frame structure.
After springs were removed

Step 2: Clean Up the Frame

I pulled out any loose staples and checked that the wood frame was still solid. If anything had been loose, I would’ve glued or screwed it first—but mine was still sturdy.

A close-up view of a piece of gray and white fabric being sewn, with visible black stitches and pins securing it to a wooden structure.
I had to remove all the staples holding the upholstery to the seat

Step 3: Replace Chair Springs With Webbing

I started by running webbing strips from the front of the seat to the back. Think of it like creating a grid, tight enough to support weight, but not overlapping at first. You will weave the strips side-t0-side after you staple to the front-to-back strips.

  • First, I stapled the end closest to the seat back (about 4–5 staples).
  • Then I pulled the strip tight—firm, not stretched like a trampoline—and stapled it in place.
  • I wrapped the loose end around the front of the chair and stapled again.
  • I used 5 strips, spaced about ½” apart.

The goal is a strong base with no big gaps that could sag later.

A hand holding a black strap inside a furniture frame made of wood, with woven material below and a striped fabric visible in the background.
I stapled webbing strips from front to back.

Step 4: Add the Second Layer (Side to Side)

Next, I ran webbing side to side over the first layer to create a grid.

  • Stapled one end, then pulled it tight from underneath
  • Same tension: tight, not overstretched
  • Again, 5 strips across

This grid replaces what the springs used to do.

Step 5: Test It Before Closing
Close-up view of a woven chair seat made of black fabric straps and wooden supports.

Before stapling everything back:

  • I tucked the fabric back into place
  • Put the legs back on
  • Replaced the cushion
  • Sat on it
  • Checked it against the matching chair

If it dips more than about an inch in the center, it needs more webbing. Mine felt firm and even, so I left it.
Close-up of a wooden tool being used to adjust or repair the fabric on a chair with decorative nailhead trim.
After with all strips staples, putting legs back on

Step 6: Close It Up

Once I was happy with the support, I stapled the dust cover back on and trimmed any loose fabric.

That was it.

What It Feels Like Now

It’s more comfortable than it was with springs. There’s no bounce—but it’s solid, supportive, and doesn’t sag.

It feels almost exactly the same height as the other chair, which is exactly what I wanted for this space.
A cozy armchair with a striped fabric design, featuring a high back and cushioned seat, positioned near large windows with natural light.
Two stylish striped armchairs with dark blue cushions sit next to a large window, featuring yellow blinds and a lamp in between them, with greenery visible outside.

Would I Do It This Way Again?

Absolutely—and I already did. Right after this chair, I fixed an antique cane-back chair on my front porch using the same method. I just had to fold the front ends of the webbing neatly since they were visible.
Pros:

  • Cheap and simple
  • Quick
  • No metal to fail later
  • Quiet—no squeaks
  • Strong and supportive

Cons:

  • None so far

Final Take

If you have a chair sitting in your house that no one wants to sit in—this is the easiest fix I’ve found.
And once you do one, you’ll start looking for more to fix. Removing the springs and replacing them with upholstery webbing is a simple way to make it solid again.


It’s not traditional upholstery. 

But it works—and sometimes that’s the only goal that matters.


FAQ: Reupholstering Chairs | Replacing Springs with Webbing

Can you fix springs in a chair

You can—but it’s way harder than it looks. Between special clips, tensioning tools, and wrestling heavy springs, it’s easy to make it worse or unsafe. After trying it myself, I’d say spring repair is better left to professionals unless you’re fully set up for upholstery work.

Upholstery Webbing vs Springs: Which is Better?

Upholstery webbing is easier to install, quieter, and more budget-friendly than springs, which makes it a great option for most DIY repairs. Springs have more bounce, but they’re harder to replace and usually require more tools and experience.u003cbru003eIf your goal is to fix a sagging chair quickly and actually use it every day, webbing is the simpler and more practical option.

Can you replace chair springs with webbing?

Yes. Upholstery webbing can fully replace springs and create a firm, supportive seat without metal components.

How do I choose the right webbing?

Natural fibers like jute or cotton give a firmer feel. Nylon and polyester are stronger and will last longer, especially outdoors. Elastic webbing is more flexible and comfortable, which is why I used it. The right choice really comes down to the style of the chair, how much support you want, and whether it’s for indoor or outdoor use.

Do I need a webbing stretcher?

No. It helps, but I just pulled the webbing tight by hand and stapled it in place. For elastic webbing you would use a stretcher with clamps, for traditional jute webbing you would use one with teeth. 

How do you tighten webbing on chairs?

Staple one end first, then pull the webbing tight and staple the other end. If it feels too soft after testing, add another strip or replace the loose one.


Leave a Reply

Your email address will not be published. Required fields are marked *