
Disclaimer: This page may contain affiliate links. If you click on one of these links and make a purchase, I may receive a small commission at no extra cost to you. I only recommend products and services that I believe will add value to my readers. See our full Affiliate Disclosure at this link.
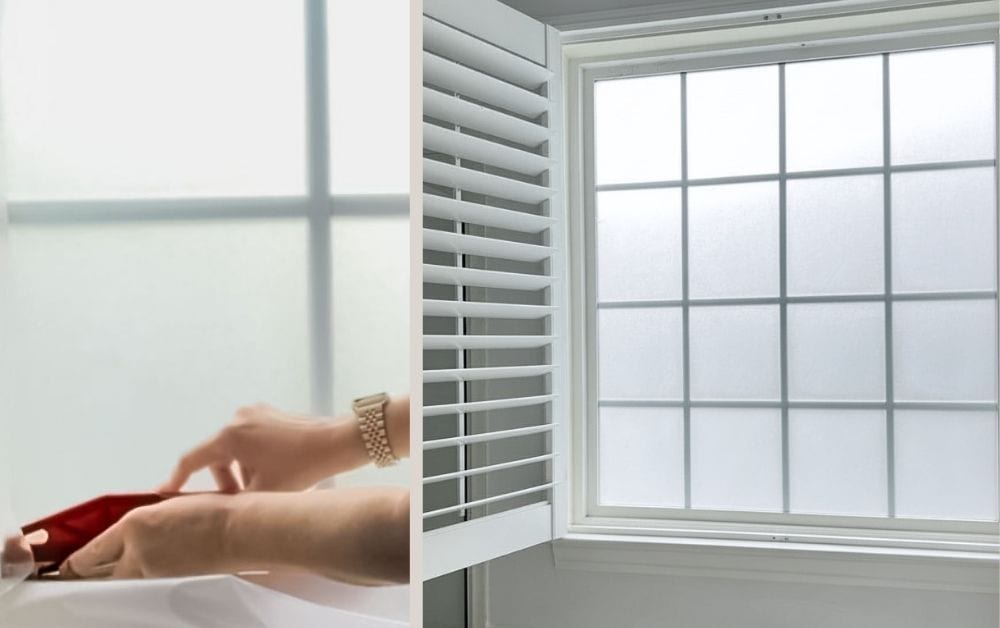
I’ve been looking for an easy way to add more privacy to our bathroom window using frosted glass without sacrificing natural light. I want the light, but I also want to take a shower without wondering if my neighbors are getting a free show. This window is located right next to our glass shower and way closer to our neighbors than I’d like, so adding frosted glass felt like the perfect solution.

After some searching, I realized there weren’t any tutorials that showed how to apply frosted window film over a window like ours—flat glass, internal muntins (not raised grid lines), plantation shutters, and in a bathroom. Specifically I wanted an after photo before I committed. So here’s exactly how I did it, what I learned along the way, and tips I wish I’d seen before I started.

What You’ll Need To DIY Frosted Glass For Windows


- Frosted window privacy film (I used this one from Amazon)
- Spray bottle filled with water + a drop or two of dish soap
- Wallpaper smoothing tool or plastic scraper (I used all of these tools)
- Utility knife or sharp blade
- Microfiber cloth or paper towels
- Patience (seriously)
Why I Chose Frosted Glass Window Film
I didn’t want to keep the plantation shutters closed all the time—it makes the room feel dark and closed in. The frosted film lets in soft natural light while totally blurring out the view from outside. Once it’s applied, it looks clean and subtle, especially with windows that have muntins built into the glass.
What Size Window Film to Buy
I originally bought the frosted glass window film to use on our French doors leading into my husband’s office—but we decided to leave those clear for now. The roll I had was 35.4” wide and 80” long, which I thought would work for the bathroom, but our window is 42.5” wide by 48.5” tall. So I was short on width.
The film actually comes in several standard widths:
- 17.5″
- 23.6″
- 29.5″
- 35.4″ (what I bought)
- 45.2″ (what I should have bought)
Instead of ordering a new roll, I made it work by cutting two equal panels and lining them up at the middle. I aligned the seam along the horizontal muntin—like wallpaper—so it visually disappears. It turned out much better than expected!
Tips & Tricks to Applying Privacy Window Film
A Few Things No One Tells You:
- The backing is way harder to peel off than I expected. You might want to start the edge with a piece of tape or scrape a corner gently with your fingernail.
- Use water with dish soap—not Windex. The soapy water helps you reposition the film easily and prevents it from sticking too fast.
- The wetter the window, the easier the process. Don’t hold back on the spray!
- It’s a lot like applying peel-and-stick wallpaper. Start at the top and smooth it down horizontally, not vertically.
- Don’t press too hard. If you apply too much pressure, you can crease or tear the film where bubbles are trapped. Use a light, even pressure and work slowly.
- If your film isn’t wide enough, plan your seam location carefully. The horizontal muntin was a perfect place to hide mine.

10 Viral Tricks For Wallpaper
10 viral wallpaper tips that actually work—cut straighter, match patterns, and hang peel-and-stick or pasted wallpaper without the usual mess.
Step-by-Step Instructions: How to Apply Frosted Glass Window Film
Time needed: 30 minutes
How to Apply Frosted Glass Window Film
- Clean the Window:
Start with a spotless surface. I wiped it down with a glass cleaner first and then went over it with the soapy water mix to make sure nothing was left behind.

- Spray, Spray, Spray:
Spray the entire glass surface with your water and dish soap solution. Be generous. The wetter, the better.

- Peel the Backing:
This part took longer than expected. I used two small pieces of painter’s tape stuck to both sides to help separate a corner and slowly peeled it back.

- Apply the Film (Top to Bottom):
Line up the top edge, press it into place, and begin smoothing it down side to side in horizontal passes. Work your way down, smoothing as you go.

- Smooth Out Bubbles:
Use a wallpaper smoother or plastic scraper with a microfiber cloth over it to avoid scratching. Light pressure is key—too much force can stretch or tear the material.

- Line Up Panels if Needed:
If you’re working with two pieces, carefully align the seam along a horizontal muntin. It’ll help disguise the join, just like a wallpaper seam.

- Trim the Edges:
Once it’s fully applied, trim the excess film around the edges with a sharp blade.

- Final Touches:
Check for bubbles and smooth gently as needed. Let it dry for a few hours before touching it again.

The Result?

FAQ: Applying Frosted Glass Window Film
Yes—frosted window film provides full privacy during the day and night. While it still lets natural light through, it blurs visibility so no one can see clear shapes or movement inside.
Definitely. Most frosted films are designed to be removable and won’t leave any sticky residue behind—just be sure to peel slowly and use warm water or a blow dryer to loosen stubborn edges if needed.
Yes! Frosted film is perfect for bathrooms because it resists moisture and is easy to clean.
Primary Bath Shopping Sources


Latest Projects
Check Out My Latest Home Makeovers and DIY Transformations
More Ideas
If you’ve got more time for bathroom ideas check out these projects.


Something went wrong. Please refresh the page and/or try again.


