


Update Glass Cabinet Front
If you’ve ever looked at older cabinet doors and thought, “Something feels outdated, but not in a good way”. The Cathedral arch, also called a Bell-shaped arch, was hugely popular in the late 1980s and early 1990s. While that might not feel vintage, remember—1980 was 45 years ago! Since vintage generally refers to items 20-100 years old, these styles are officially in that category.
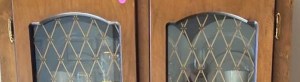
When updating my china cabinet, I knew I wanted a cleaner, more modern look. The curved arch on the doors felt too traditional for the sleek, dry bar style I was going for, so I decided to modify it. Here’s how I did it!
Supplies Needed:
✔ Jigsaw – To trim down the arch, Cut everything from hardwoods to marble with this versatile DEWALT jigsaw kit.
✔ Fine-tooth wood blade – To prevent chipping and tear-out, Diablo by Freud jig saw blades are optimized for precise and accurate straight, angled, and curved cuts.
✔ Orbital sander – To quickly smooth the edges, this great entry level sander is easy to control and comfortable to use, and will last longer than other brands.
✔ 120- and 220-grit sandpaper – For a seamless finish
✔ Safety goggles & gloves – Always protect yourself when cutting wood!
✔ Painter’s tape – Helps prevent splintering when cutting
✔ Wood filler (optional) – To fill any imperfections before painting
✔ Primer & paint or stain – To finish the cabinet to your style
Step 1: Removing the Glass
The cabinet doors had glass inserts, so the first step was carefully removing the glass before making any cuts. If you’re doing this at home, be sure to wear gloves and work slowly to avoid cracks or breakage.
Step 2: Trimming the Arch
To soften the cathedral-style bump, I used a jigsaw to carefully trim down the arch into a more subtle, modern shape. When cutting, I made sure to follow the existing lines as smoothly as possible to avoid uneven edges.
Step 3: Sanding for a Smooth Finish
Once the cut was made, I used a combination of an orbital sander and hand sanding to smooth out any rough edges and create a seamless look. This step is key to making the update look professional rather than DIY-ed.
The Result? A Fresh, Modern Cabinet Front!
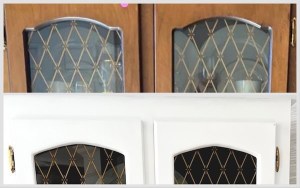
By making this simple modification, I was able to transform the look of the cabinet doors without replacing them entirely. If you have older furniture with similar arch details, this method is a great way to modernize the style without a huge investment.
Would you try this update on your cabinets? Let me know in the comments!
More Easy & Quick DIYs
Paint, peel-and-stick, hardware swaps, and small upgrades that make a big difference.
















Leave a Reply