This sandpaper grit chart breaks down exactly what each grit number is used for so you’re never guessing mid-project again. If you’ve ever wondered whether you should be using 80, 120, or 220 grit for sanding furniture or prepping for paint, this guide makes it simple. If you’re prepping furniture or cabinets for paint, my guide to sanding tools for DIY projects breaks down the best tools to pair with this grit chart.
Sandpaper Grit Chart Explained
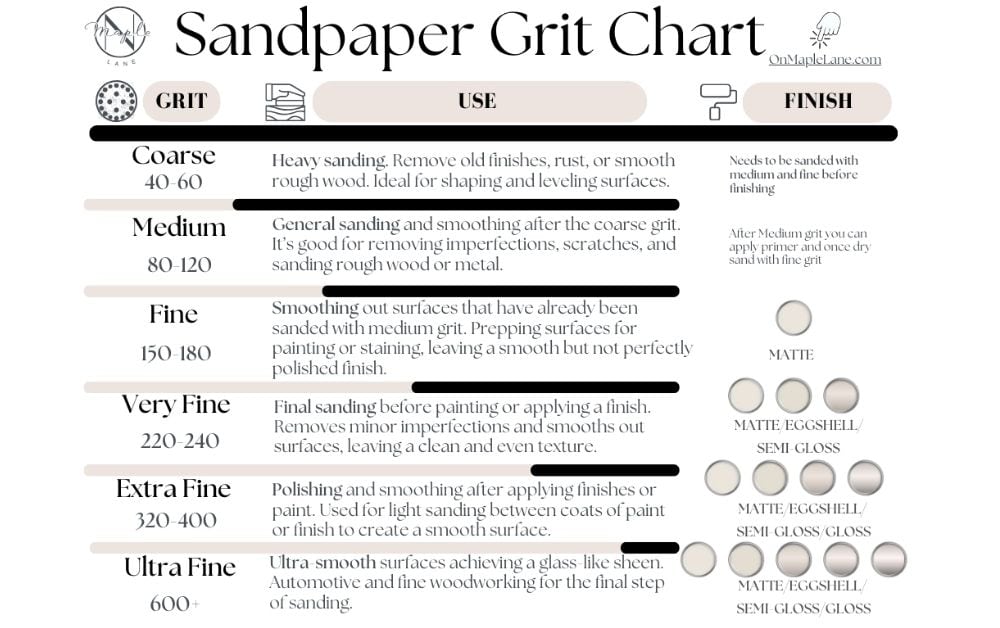
| Grit | What it’s used for |
|---|---|
| 40–60 | Removing paint and heavy material |
| 80 | Smoothing rough wood |
| 120 | Preparing wood for paint |
| 150–180 | Between coats of paint |
| 220 | Final finish sanding |

Sandpaper Grit Chart
Here’s the full grit chart for quick reference. Use it to pick the right grit for sanding wood, prepping furniture for paint, or smoothing between coats of finish. For step-by-step surface prep, you can also check out my tutorial on spray painting tips every DIYer should know, which pairs perfectly with this grit chart. If you’re sanding exterior surfaces or repairing worn wood, my step-by-step guide to repairing and painting exterior stairs shows exactly how I choose the right grit for outdoor projects.

What grit sandpaper should I use?
FAQs
It depends on what you’re doing.
40–60 grit → heavy sanding, stripping finishes, shaping wood
80–120 grit → general sanding and smoothing rough surfaces
150–180 grit → preparing wood before painting or staining
220–240 grit → smoothing between coats of paint or finish
320+ grit → final polishing and ultra-smooth finishing
Start with 120–150 grit to smooth the surface, then finish with 220 grit before applying primer or paint.
If you start too fine, nothing really gets sanded and you waste time.
If you start too coarse, you can gouge the wood and create scratches you’ll have to fix later.
If you finish too coarse, scratches will show through paint or stain.
If you finish too fine, the surface gets slick and paint or stain won’t stick well.
There’s a sweet spot — usually 220 before paint and 180–220 before stain — that gives you adhesion and smoothness.
When the scratches from your previous grit are gone. If you move on too early, you lock those scratches into your finish. If you wait too long, you’re just dusting wood for no reason.
A quick test: wipe the surface with a damp cloth. If you see deep lines or unevenness, stay on the current grit a little longer.
Sanding Tools I Actually Use and Recommend


These are the same tools I reach for in my own projects—whether I’m repairing and painting our exterior stairs, smoothing out trim while installing staircase wainscoting panels, or prepping French doors for a fresh coat of paint. I also use this same grit progression when I’m choosing the right type of paint for a project, because good prep and good paint always go hand in hand. In all of these projects, the chart above keeps the sanding steps simple and predictable.
Disclaimer: This page may contain affiliate links. If you click on one of these links and make a purchase, I may receive a small commission at no extra cost to you. I only recommend products and services that I believe will add value to my readers. See our full Affiliate Disclosure at this link.

More Tool Guides
If you’ve got more time, check out these guides.


