If your doors are starting to feel dated, this is one of the easiest fixes you can make. I’m breaking down exactly how to swap out old doorknobs for something that actually fits your home—no full renovation needed.
It’s a quick, affordable update that makes a bigger difference than you’d expect. I’ll cover how to choose a style that works, what tools you actually need, and how to install everything without it turning into a frustrating project.

Go straight to
Disclaimer: This page may contain affiliate links. If you click on one of these links and make a purchase, I may receive a small commission at no extra cost to you. I only recommend products and services that I believe will add value to my readers. See our full Affiliate Disclosure at this link.

How To Switch From a Doorknob to a Cabinet Pull
Removing the Old Doorknobs
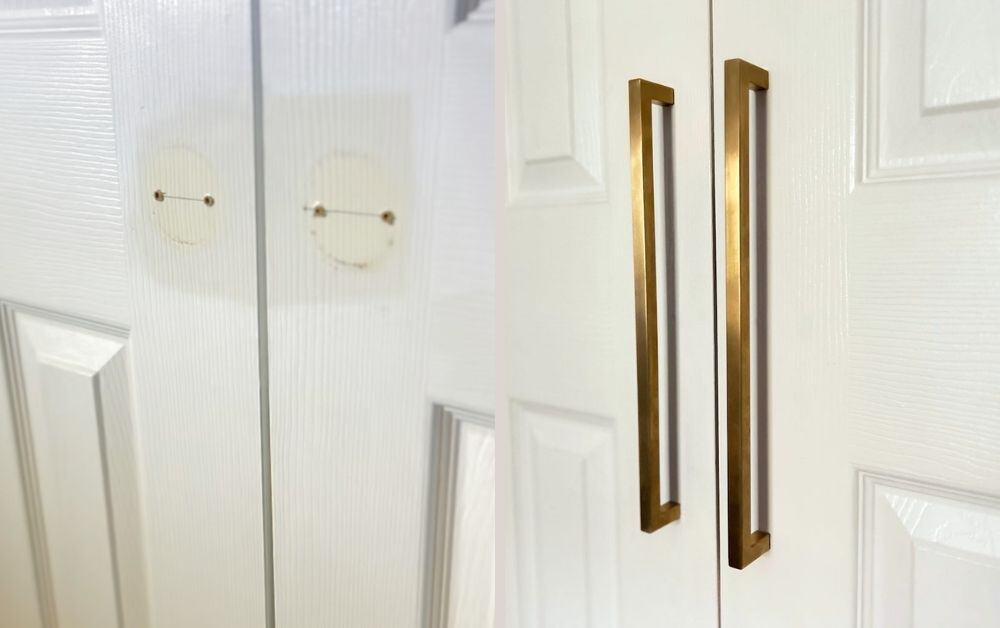
Replace Ugly Dated Doorknobs- First, I removed the dummy doorknobs and was left with some holes that wouldn’t be covered by the new handles.

Filling the Holes
I used paint scraper to push the holes flush with the surface of the door. Then used wood filler, but I wish I had used Bondo.

If you’re fixing holes in a hollow-core MDF door


- Wood Filler (Goodfilla)
Best for small holes, dents, and surface imperfections. Easy to sand and paint, but not strong enough for deep damage. - Ready Patch
Great for medium repairs where you want a smoother finish. Dries fast, sands easily, and blends well under paint. - Bondo
Best for larger holes or damaged areas. Sets fast, dries rock hard, and doesn’t shrink—ideal when you need durability. - Plastic Wood / Epoxy Filler
Easy to work with and beginner-friendly. Good for shallow to moderate repairs, but softer than Bondo and can shrink a bit on deeper fills.
What works best?
If you’re fixing real holes in a hollow-core door, skip the lightweight stuff.
- Best overall: Bondo (#3)
It bonds well, doesn’t shrink, and gives you a solid surface that won’t cave in later. - Easiest to use: DAP Plastic Wood (#4)
Way more forgiving—but better for smaller or layered repairs, not one big deep fill.
The others are fine for touch-ups—but not for actual hole repair.
After letting it dry completely, I sanded it down until it was smooth and level.

Touching Up the Paint
I touched up the door with paint to cover the wood filler. Rather than repaint the entire door, I feathered out the paint to blend it with the existing finish. Luckily, I had already painted the doors with a durable, easy-to-clean paint, so the touch-ups were quick and seamless.

Tips for Painting Interior Doors in a Kid’s Room
- Choose the Right Paint Type
For durability, I recommend using a satin or semi-gloss finish. These finishes are not only long-lasting but also easy to wipe clean—perfect for a child’s room where fingerprints and smudges are inevitable. - Allow Proper Drying Time
Let each coat dry fully before applying the next. Sanding lightly between each coat will make THE BIGGEST DIFFERENCE IN THE OUTCOME. This helps prevent tackiness and ensures the smoothest, strongest and durable finish.

How to Attach the New Hardware (And Keep It From Loosening Later)
Once your repairs are fully dry, you’re ready to install the new hardware.
I lined up the new pull with the recessed panels on the door. Then just drilled new holes and inserted the screws from the back of the door.
Before tightening everything down, add a small washer between the screw head and the door. This helps distribute the pressure so the screw doesn’t slowly pull through the door over time—especially important if you’re working with a hollow-core door or a patched area.
The Hardware I Chose

The bar pulls I used were leftovers from a 5-pack I originally bought to update the hardware in my kitchen. These 12-3/5 inch pulls are perfect for upgrading cabinets, drawers, or closet doors. When I bought them a few years ago, the set was a steal. For their size and quality, these modern and budget-friendly pulls are a fantastic option for DIY home improvement projects.
The Result
Replace Ugly Dated Doorknobs With Pulls

A simple hardware swap made all the difference. The new bar pull handles gave the closet a cleaner, more modern look—and fixed the bent, outdated knobs in the process.

If you’re looking for more tips how to replace ugly dated doorknobs or just choosing the right hardware for your projects, check out my hardware guide!


Latest Projects
Check Out My Latest Home Makeovers and DIY Transformations
More Ideas
If you’ve got more time for home improvement ideas check out these projects.


Something went wrong. Please refresh the page and/or try again.


