Want a better backyard but feel overwhelmed at the idea of major construction? We get it — building a traditional deck can seem expensive, complicated, and utterly intimidating.
That’s exactly why we chose a floating deck: an easier, budget-friendly project that completely changed our backyard.


If you’re looking for a manageable DIY project, keep reading to see the full before-and-after.
Plus the simple steps that made this project easier (and way more affordable) than we expected.


Deck vs. Gravel Patio: Which Outdoor Space Works Best?

My husband was leaning toward a fire pit area with crushed oyster shells or gravel. I love the look, but the maintenance? No thank you. From rocks ending up in the grass (and our house), to leaf cleanup turning into a full-time job… it just didn’t feel realistic for us.
So we pivoted. And I’m so glad we did.
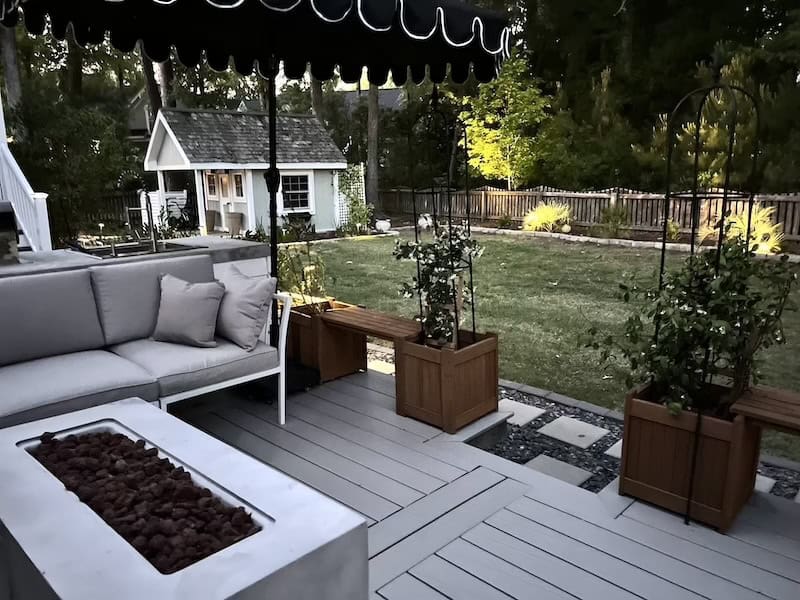
Backyard Deck Ideas

We wanted a seamless connection between the deck and the outdoor kitchen installed last year. For the kitchen, we chose concrete and charcoal pavers and used mahogany composite decking for the staircase.
Our existing furniture is teak, (similar because ours is sold out). If our furniture was to move to the deck, I wanted to avoid brown wood furniture on a brown deck.

Veranda composite decking in Stone Gray was the perfect match. And it’s low-maintenance.
Build a Floating Deck in 8 Simple Steps: Budget-Friendly Guide


Time needed: 4 days
How We Built Our DIY Floating Deck (Step-by-Step)
Here’s a simple guide to how we transformed our backyard with a floating deck, including the materials we used:
- Plan and measure your space
Planning the size first helped us map out material needs and avoid last-minute changes.
- Clear and prep the ground
Then we cleared grass and leveled the dirt. Next, landscaping fabric to block weeds from growing up under the deck.
- Build the frame
Using pressure-treated 2×6 lumber, we constructed a rectangular frame. We made sure it was perfectly square and level, which is key to a stable deck.
- Set the foundation with deck blocks
Instead of digging footings, we used deck blocks to support the frame. They’re easy to move and adjust — perfect for DIYers who want a quicker build.(Always check your local building codes to ensure the use of deck blocks is permitted and that the design meets the required standards)
- Install joists
We added evenly spaced pressure-treated joists across the frame, securing them with joist hangers. This is to make sure the structure was strong enough to hold furniture and foot traffic.
- Attach decking boards
We chose Veranda Composite Decking in Stone Gray to match our existing pavers and concrete. It’s low-maintenance, durable, and gave the deck a clean, polished look.
- Build custom features
To make it even more functional, we added two bump-outs for planter benches, framed with the same composite boards for a cohesive design.
- Finish the edges
We trimmed the sides of the deck with composite fascia boards to hide the frame and give the whole deck a clean, professional finish.

Important Note About Permits and Building Codes
If you’re building a floating deck in Charleston County, South Carolina (or anywhere really), make sure to check local building codes before starting. Here’s a quick breakdown of what we found:
- Permit Requirements: Decks under 200 square feet, less than 30 inches off the ground, and freestanding usually don’t need a permit. Always double-check your specific situation to be safe!
- Deck Blocks: Allowed for freestanding decks that meet the above size and height limits. Bigger decks need traditional footings.
- Height Rules: Decks over 30 inches high require guardrails at least 36 inches tall.
- Attaching to the House: If your deck connects to your house, you must remove siding where it attaches and install proper flashing to prevent leaks.
- Freestanding Tip: Keeping the deck detached (freestanding) simplifies the process — no structural attachment to the house means fewer code requirements.
Tip: You can always just call your local building department and ask. So you don’t run into any surprises down the line!

Materials and Costs for a Floating Deck
| Item | Price | Notes |
|---|---|---|
| Veranda Composite Decking (Stone Gray) | $3.75 per square foot | $3.77 per square foot for square edge boards (compared to $7-$15 for other brands) |
| BuildTuff TuffBlock Deck Supports | $12 per block | (See: How many deck blocks do you need? for more info on how many you’ll need) |
| Trex Hideaway Hidden Fasteners | $0.55 per square foot | (These fasteners are used for the decking boards) |
| Trex Hideaway Universal Starter Clips | $0.90 per square foot | (For securing the first and last row of deck boards) |
| FastenMaster Plugs | $28 for 75 plugs | (Used on the fascia where hidden fastener clips couldn’t be used) |
| Pressure-Treated Wood for Deck Frame | $1.50 per square foot | (See: Home Depot’s Decking Calculator for a detailed breakdown) |
Total Cost for a 120 sq ft Deck:

$450 (decking) + $96 (deck supports) + $66 (fasteners) + $108 (starter clips) + $7 (plugs) + $180 (pressure-treated wood)
= $907
Shop the Materials

We’ve rounded up everything we used to build our floating deck. These are the exact products that made our project easy, affordable, and look amazing:
- Veranda Composite Grooved Deck Boards (Stone Gray)
- Veranda Composite Square Edge Deck Boards (Stone Gray)
- BuildTuff TuffBlock Deck Supports
- Trex Hideaway Hidden Fasteners
- Trex Hideaway Universal Starter Clips
- FastenMaster Collated Cortex Hidden Fastening System (2-1/2″ Cortex Screws + Stone Gray Plugs)
- Pressure-Treated Wood


Note:
Some of the links are affiliate links, meaning I may earn a small commission if you make a purchase at no extra cost to you. Thanks for supporting the blog!


Low-Maintenance, High-Impact: Why We Chose a Floating Deck
Now we have a beautiful, functional deck that serves as a lounge and movie space (subscribe to be notified when that guide is up). Whether we’re entertaining or just unwinding as a family, it’s exactly what we needed.
Building this floating deck completely transformed how we use our backyard, and it made the space feel so much more like “us.”
If you’re thinking about upgrading your outdoor space without a massive construction project, we hope our experience gives you the confidence to dive in. You don’t have to spend a fortune (or hire a crew!) to create a beautiful, functional spot for relaxing and making memories.
And if you know someone who could use a little outdoor inspiration, be sure to send this post their way!


You May Also Like

The Coastal Backyard Amazon Dupes
Transform your backyard into a coastal retreat without overspending. These Amazon dupes look just like designer pieces—see how to get the look for less!

Your Home’s Exterior Style
Learn popular exterior home styles, how to identify them, and what each style means for your decor and design. Your go-to guide for exterior home styles.

How to Pressure Wash a Rug
Our outdoor rug was looking rough after a messy season outside. Instead of replacing it, I pressure washed it—and wow, the difference.


